
Hola queridos lectores
Una vez más estoy aquí con ustedes, participando en el 2021 Calendario de Adviento organizado por Matxalen. Muchas gracias Matxalen por invitarme.
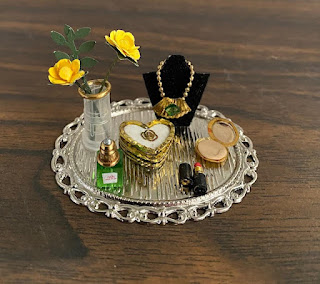
Este es mi paso a paso tutorial para hacer una bandeja de toquador para una muñeca elegante
En la bandeja de la foto de abajo hay elementos que se pueden preparar fácilmente con materiales fáciles de encontrar. Usé pegamento pegajoso para todo en este tutorial.
Para una muñeca elegante
Hello dear readers
Once again I'm here with you, participating in the 2021 Spanish Advent Calendar organized by Matxalen. Thank you Matxalen for inviting me.
This is my step-by-step tutorial for making a vanity tray for an elegant doll.
On the tray in the photo below are items that can be easily prepared from easy-to-find materials. I used tacky glue for everything in this tutorial.
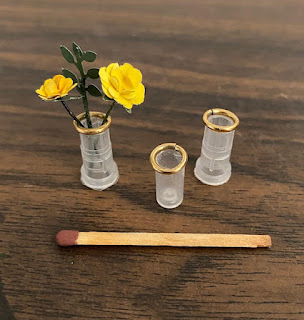
The long vase is cut out from an injection needle protector. The flowers are from punched-out colored paper but any small plastic flower can replace them. I glued a jumper ring to its top to embellish the "vase". Glue a little piece of transparent acetate to the bottom, trimming it with scissors.

2. EL COLLAR:
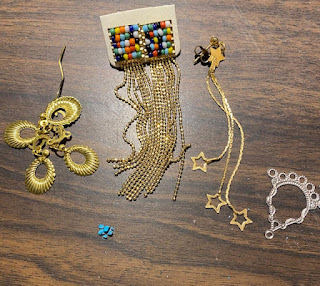
Usé piezas de joyería rotas para hacer el collar. Las fotos a continuación explican mejor que las palabras.
Una buena fuente de cadenas y piezas de metal son los pendientes baratos. Los cinco collares a continuación están hechos de estos dos pendientes. Las piedras azules que adornan los collares son de una cuenta de turquesa genuina rota que aplasté con un martillo. Las otras piedras son adornos de uñas.
2. THE NECKLACE:
I used broken pieces of jewelry to make the necklace. The photos below explain better than words.
A good source for chains is metal parts of cheap earrings. All five necklaces below are made from these two earrings. The blue stones adorning the necklaces are from a broken genuine turquoise bead which I crushed with a hammer. The other stones are nail embellishments.
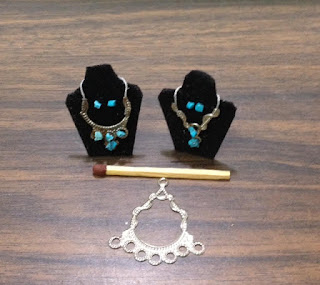

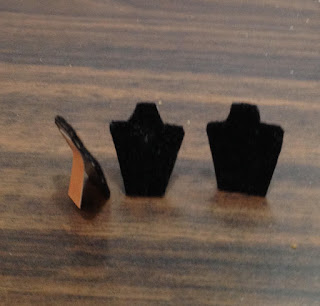
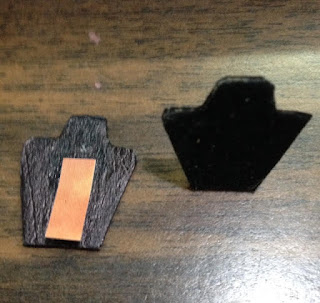
3. EL SOPORTE DE COLLAR:
El soporte está hecho de una cartulina sobre la que se pega un papel de terciopelo negro. Para que quede vertical, pegue una tira de cartulina detrás y dóblela hacia atrás. (vea las fotos a continuación).Simplemente puede pintar la tarjeta de negro, que también será un buen fondo para el collar.
3. THE NECKLACE STAND:
4. EL LAPIZ LABIAL:
4. THE LIPSTICK:
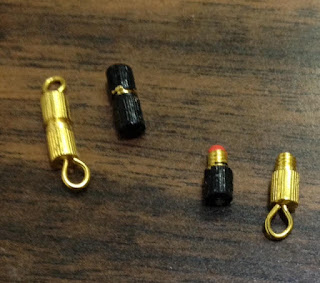
Un simple cierre de collar de cuentas es necesario para hacer este lápiz labial. atorníllelo y píntelo casi todo de negro, dejando el medio sin pintar. En la parte central abierta sin pintar, empuje el extremo de un palillo de dientes pintado de rojo o un poco de arcilla polimérica roja.
A simple beads necklace clasp is necessary for making this lipstick. screw it apart and paint it almost all over black, leaving the middle unpainted. Into the open unpainted middle part push either the end of a red painted toothpick or a bit of red polymer clay.
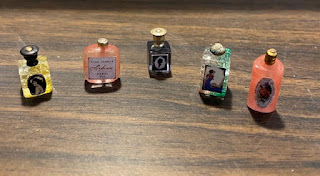
5. EL FRASCO DE PERFUME:
5. THE PERFUME BOTTLE
Necesitará una cuenta de su elección; la parte de atrás de un pendiente; un alfiler (cortado en una longitud adecuada; una etiqueta pequeña (la mía es de un periódico).
You will need a bead of your choice; a back of an earring; a pin (cut into a suitable length; a tine label (mine is from a newspaper).
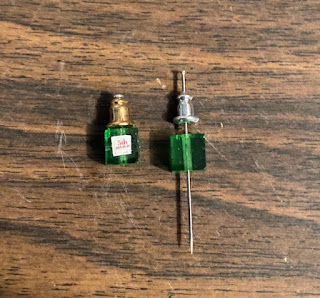
El frasco de perfume de abajo eran obsequios de Jennifer
The perfume bottles below are gifts from Jennifer.
Translation resultsNecesitará una cuenta de su elección; la parte de atrás de un pendiente; un alfiler (cortado en una longitud adecuada; una etiqueta pequeña (la mía es de un perTTThe perfume bottle below were gifts from Jennifer
Translation resultTodos los frascos de perfume en la foto de abajo son regalos de JennifeAll the perfume bottles in the photo below are gifts from JennifeThe bottles below are all gifts6. EL JOYERO
6. THE JEWELRY BOX
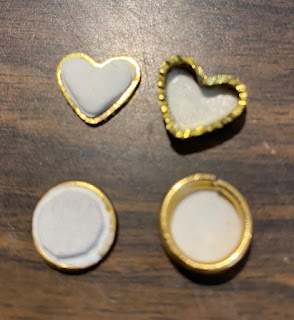
Para realizar este tipo de joyeros pequeños es necesario utilizar anillos metálicos redondos, fornituras de joyería en forma de corazón o flor, etc. todos igualmente del mismo tamaño.
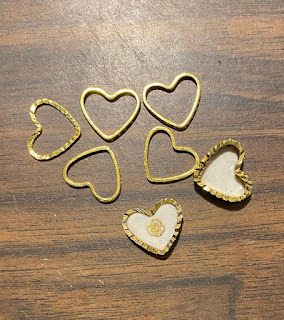
Esta caja está hecha de 5 fornituras de metal en forma de corazón. En dos de ellos se colocó una bola plana de arcilla blanca Fimo para que se horneara en el horno según lo recomendado por Fimo u otros fabricantes de arcilla polimérica. Use uno para la capa inferior y el otro para la cubierta. Los otros tres se pegarán, uno encima del otro. y luego a la pieza inferior de Fimo. Corta un trozo de espuma artesanal fina (eva) en forma de corazón y pégala debajo de la tapa para mantener la caja firmemente cubierta. (vea la tercera foto a continuación).
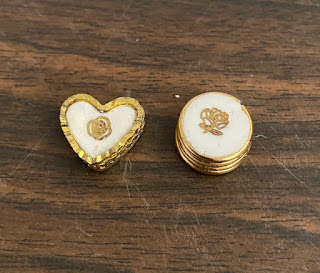
Decora la parte superior de la caja con un adorno de uñas.
To make these types of small jewelry boxes it is necessary to use round metal rings, heart-shaped or flower-shaped jewelry findings, etc. all equally the same size.
This box is made from 5 metal heart-shaped jewelry findings. Into two of them pushed a flattened ball of white Fimo clay to be baked in the oven as advised by the Fimo or other polymer clay manufacturers. Use one for the bottom layer and the other for the cover. The three others are to be glued, one on top of the other. and then to the bottom Fimo inlaid piece. Cut a piece of heart shape thin craft foam and glue it under the cover to keep the box firmly covered. (see the third photo hereunder.)
Decorate the top of the box with a nail embellishment.
7. EL COMPACTO DE MAQUILLAJE:
7. THE MAKEUP COMPACT:
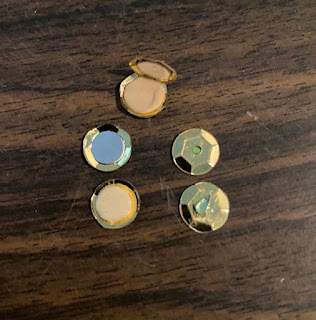
Materiales;
Lentejuelas doradas de 7 mm; Fimo beige o otra arcilla polimérica; tarjeta plateada para "espejo"; pegamento pegajoso.
Con un punzón de oficina ordinario, perfore un círculo de la tarjeta "espejo". Haga una pequeña bola de arcilla, aplánela para que se ajuste al interior de una lentejuela. Hornee y luego péguelo a la lentejuela. En el interior de la segunda lentejuela pegue el espejo diminuto. El agujero de la lentejuela de espejo se puede cubrir con un pequeño adorno de uñas.
Materials;
7 mm gold sequins; beige Fimo or other polymer clay; silver card for "mirror" tacky glue.
With an ordinary office punch, perforate a circle from the "mirror"-card. Make a tiny ball of clay, flatten it to make it fit the inside of one sequin. Bake and then glue it to the sequin. Into the inside of the second sequin glue the tiny mirror. The hole in the mirror sequin can be covered with a tiny nail embellishment.
Estimados lectores, no olviden marcar los números del Calendario de Adviento 2021 en el lado izquierdo de la barra de mi blog. Cada uno de los 24 días contará con un tutorial de diferentes blogueros talentosos y experimentados.
Aprovecho esta oportunidad para felicitar a Matxalen. Diez Calendarios de Adviento exitosos no son un logro menor, deseo que continúes, Matxalen, esta tradición por muchos años más.
¡Feliz Adviento, Feliz Navidad y Feliz 2022!
Dear readers, please do not forget to poke the numbers on the 2021 Advent Calendar on the left side of the bar of my blog. Each of the 24 days will carry a tutorial by different talented and experienced fellow bloggers.
I am using this opportunity to congratulate Matxalen. Ten successful Advent Calendars are no small achievement, Matxalen, I wish you to continue this tradition for many more years.
Happy Advent Days, Merry Christmas, and a Happy 2022!
Un gran tutorial Drora y muy ingenioso. Muchas gracias por mostrarnos el paso a paso. Te ha quedado todo precioso, Feliz Navidad. Besos
ReplyDeleteUn estupendo tutorial, que engloba varios. Muchas gracias por compartir!!
ReplyDeleteBesotes, Ana (analabea)
Muy bonito y elegante ese conjunto de tocador.Muchas gracias por el tutorial.
ReplyDeleteBesitos
muy bonito tutorial y sencillo de hacer
ReplyDeletefelicidades
shalom
Drora, muchas gracias por tan completo y bonito tutorial!!
ReplyDeleteBesos.
Wat een mooie spullen heb je gemaakt! Dank je wel voor het delen
ReplyDeleteMuchas gracias por los tutoriales, queda un conjunto bonito y elegante. Besos
ReplyDeletevarios tutoriales en uno, muchas gracias
ReplyDeleteUnos tutoriales geniales y tú una persona fantástica, muchas gracias y Feliz Navidad, un abrazo
ReplyDeleteGracias por tu tutorial.
ReplyDeleteEs un conjunto muy bonito para un tocador.
Un saludo
Gracias por el tuto Drora. Me encantan las cosas sencillas. Un año más nos encontramos en el Calendario de Matxalen. Besos
ReplyDeleteFantástico tutorial Drora. Me han encantado todos y cada uno de los elementos que has hecho.
ReplyDeleteTienes una gran facilidad para hacer preciosos collares.
Las cajas son muy lindas!!!!
Thanks for this beutiful tutorial.
ReplyDeleteMerry Christmas and Happy 2022.
Un montón de pequeños y bonitos detalles para el tocador, gracias por compartir. Un beso
ReplyDeleteTeredu
Thank you so much Drora for this great tutorial. I hope I can continue organizing the calendar and that you are on it. I wish you a Merry Christmas.
ReplyDeleteHola Me encantas esas joyas que has hecho.Yo no me atrevo a hacerlas son muy pequeñas y mis ojos ya no ven bien. Enhorabuena son preciosas
ReplyDeleteA great tuto, Drora. Thank you very much. Merry Christmas and a Happy New Year to you tooD!!
ReplyDeleteThank you for a wonderful explained tutorial containing so many lovely and inspiring ideas.
ReplyDeleteHugs
Birgit
Me encanta. Un estupendo tutorial.
ReplyDeleteWhat a wonderful tutorial dear Drora, thank you very much xxx
ReplyDeleteOh how lovely! I can't wait to try some of these out! Especially that compact and lipstick. So cute!
ReplyDeleteThank you Drora for these tutorials. I hope I can find similar metal pieces in my stash, so that I can try to make similar items.
ReplyDeleteI wish you a Merry Christmas too
Ersilia
!С наступающим новым годом! Здоровья, счастья, мира!
ReplyDeleteDear Drora. As usual, your ideas for repurposing materials are genius! I didn't get to make any of the advent calendar projects this year, but I have stored the ideas away for future use. Wishing you a happy and creative 2022! Megan
ReplyDeleteSorry to be so late dear Drora! The vanity trays are just marvelous and so ingenious!
ReplyDeleteHope all is well with you and that 2022 is off to a wonderful start!
Hugs!